Creating Email Auto Reply/ Vacation Mail
Steps to Creating Email Auto Reply/ Vacation Mail
Objective: If you are going on vacation and will not be able to check your mail for a while, you may want to leave a vacation notice that will be automatically sent to your correspondents once they send e-mail to your address. This is done with Auto-Reply facility, also referred to as auto-responder. Aside from vacation notices, organizations can use automatic replies to notify customers that their orders or technical support requests were received and will soon be processed. Auto-Reply can include pre written messages in plain text or HTML format, and they can contain attached files as well.
Step 1: Log in to the Plesk Control Panel.

Step 2: Select the domain. Now click on the Mail Accounts icon.

Step 3: Then click on the email ID from the E-mail address list for creating Auto-Reply.
.png)
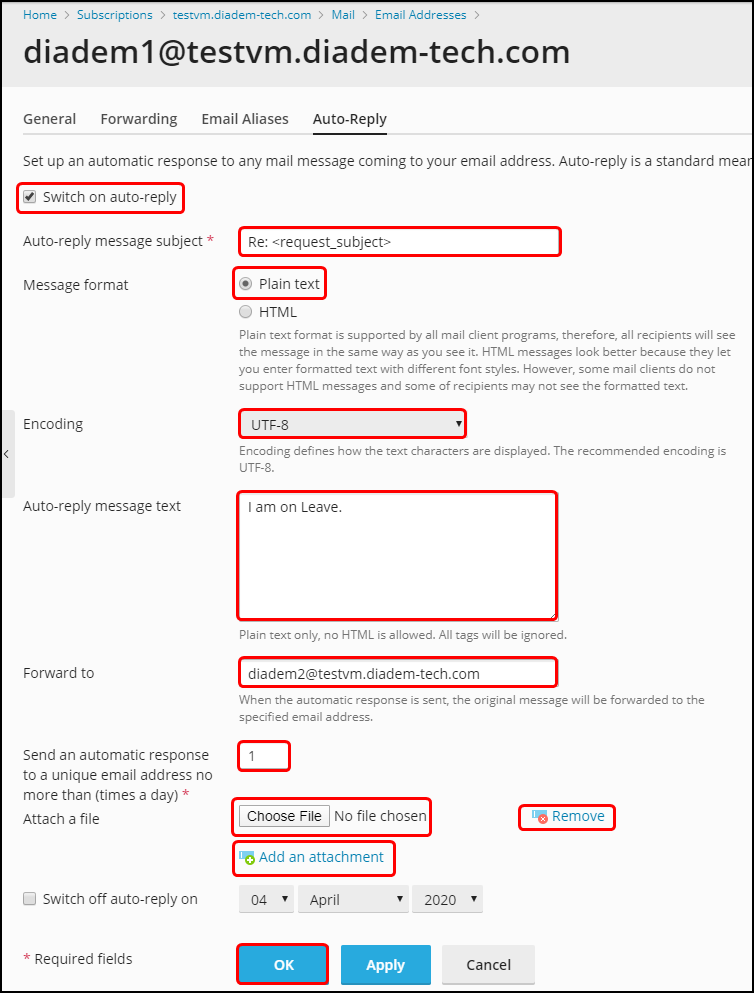
Step 4: Click on Auto-Reply tab.
.png)
Step 5: Below are the descriptions of the number sequence.
- Click on Switch on auto-reply select box.
- On the Auto-reply message subject input box : Change the subject if you want to change subject otherwise keep as it is to send sender's subject for your auto-reply.
- On Message format radio button : Format of your auto-reply email. Choose Plain text for text type or HTML for HTML type email message.
- Keep Encoding as it is for character type.
- On Auto-reply message text area: Write the message you want to send the sender as your auto-reply.
- On forwarding to input box: If you specify an email ID then at the time of auto-reply you will get the original email on this email ID.
- Send an automatic response to a unique email address.
- The Remove link beside Attach a file button will remove corresponding Attach a file option.
- Removed attached file.
- The Add new attachment link below the Attach a file button will add another Attach a file option.
- Click OK button when finished.
Step 6: You are done,your Email Auto-Reply has been created.
.png)
Related Articles
Mail address creation, forwarding, alias and auto-reply in CWP panel
Mail address creation, forwarding, alias and auto-reply in CWP panel Creating email address for a domain in CWP Managing an email address Create forwarders for an email Setting auto-reply for an email address Step 1: Creating email address for a ...Create Auto reply, Email alias, Email forwarder, and Failed login policy on zimbra 8.
Log in to your zimbra admin panel to manage Auto reply, Email forwarder, Email alias and Failed login policy. Create Auto reply Login to your zimbra admin panel and click on Manage Now choose the option Accounts and double click on the email id you ...Configuring authenticated email form delivery with PHPMailer
Objective: We have disabled the support for script through mails without authentication along with the up-gradation to Plesk. If a website uses a feedback or any mail sending script, then it has to be updated to ensure that it uses authenticated SMTP ...Creating POP3 account in Apple Mail
Run Apple Mail. If you run it for the first time and do not have any mail accounts configured in it, skip the next step: Apple Mail will take you directly to creating one. Open the Adding Mail Account wizard: Click Mail > Preferences.... Select the ...Email id configure on ipad and iphone.
IPad IPhone Zimbra NE incoming and Outgoing Server Details Email id configure on iPad # Step: 01 1. For configuring email id on ipad, please open the iPad and click on the email icon available at the iPad dock. # Step: 02 2. Now croll down and tap on ...